Creation/Management/Remote Control/Skins: Difference between revisions
m (→User Skins) |
|||
| Line 7: | Line 7: | ||
===User Skins=== | ===User Skins=== | ||
[http://forums.graalonline.com/forums/attachment.php?attachmentid=49422&d=1253633425 Bleach] (by [[user:xXziroXx|Ziro]]) | |||
==Skin-it Yourself!== | ==Skin-it Yourself!== | ||
Revision as of 16:38, 22 September 2009
Helpful Resources
Hex Color Code Generator | Hex Color Chart | Hex Color Wheel/Chart #2
Downloads
User Skins
Skin-it Yourself!
By Streety
The "skin" of the RC (as we'll refer to it as), consists of the images that are put together to make up the window's appearance. It's possible for you, the developer (or server staff), to edit your RC's skin to something more personal. If graphics are your cup of tea, this article is for you.
First off you need to understand that you will not find the images anywhere in your Graal folder. These images are programmed directly into the RC application, and thus are untouchable in that aspect. However, you can go about creating your own images and replacing the old ones in the few following easy steps.
Before anything, download the .zip file at the bottom of this post (Save this in your Graal folder, preferably). Then, to start, locate "control2config.txt" in your Graal folder. This is where all of the information for your Remote Control application's appearance (and the like) are kept. Please open it, and just brush through it. Most of the variables should make sense right away, they're pretty self explanatory (Example:nohtmlinpms=... /no html codes in PMs).
Since you're only editing the skin, or the images of the window, scroll down in the text file. You're going to start notice some image names and hex color codes. These are the things you're going to be editing. As a side note, notice that the majority of these images are two different states for the same thing (buttons (up&down)). Use the templates below to size your images accordingly, and get to editing.
Once you've made all of your graphics, you're going to go back into the "control2config.txt". Scroll back down to the bottom, and let's get editing. You can go about this one of two ways: You can place your images directly in your graal folder, or you can make a separate "newrc" folder (or something like that).
Start placing the appropriate image names in their corresponding places (if you made a separate folder ex: background=/newrc/rc_graalonline2.PNG =means-> /folder/image). If you placed your images directly in the Graal folder, you don't have to worry about any forward slashes and can get directly to editing by placing the names of your images in the old image places. Once you've placed your images in the correct spot, you can move onto the palette for your colors. This is probably the most tedious portion.
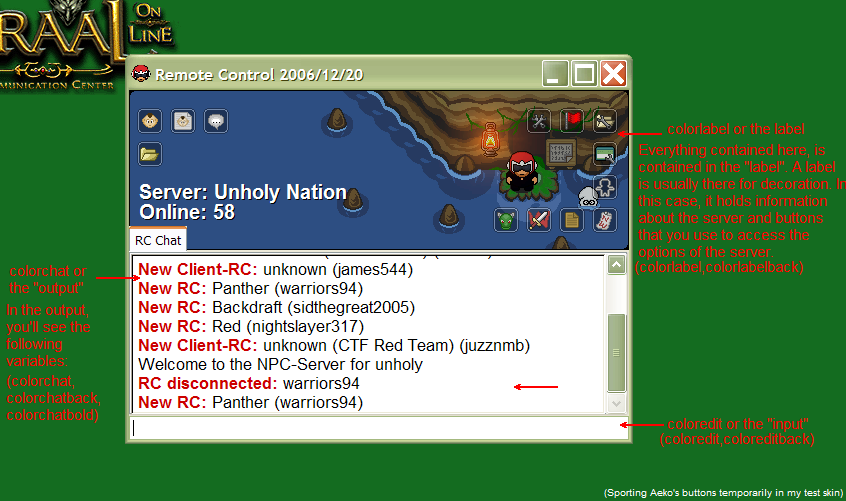
The palette for your colors is all based on what hex color codes you put in. Personally, I'd go for something that matches your background image. Here is a descriptive list of what each variable is:
Background
This is the header (so to speak) image of your RC. It is the largest image, and takes up a majority of the "label" space. It's the background, and anchor of your RC skin so to speak. It is 500x160 pixels when RC is opened on default (This is what you should make your image if you want to avoid any blurriness).
Coloredit
The color of the font that you see when you type in the "chat box" (or 'edit' output)
Coloreditback
The background color for the edit input. (or chat box)
Colorchat
The color of non-bolded text in the main chat portion of your RC, also known as the output. (Where you see what other staff members type, or when a script is updated, etc.)
Colorchatback
This is the background color for the output/main portion of the RC.
Colorchatbold
This is the color of bolded text used in the output/main portion of RC. It's used when people log in, for example.
Colorlabel
This is the color that the text placed over your "background" image is defined with. (Name of the server, number of players, etc.)
colorlabelback
This color is used in the event there is no background image. This portion of a "skin" is known as a "label".
labelservers
This is the text on your "label" that says the server your RC is currently logged into.
labelplayers
This is the text on your "label" that says the amount of players currently on the server your RC is logged into.
