Creation/Dev/Terrain Generator: Difference between revisions
From Graal Bible
No edit summary |
(fixed page to reflect new tutorial) |
||
| Line 7: | Line 7: | ||
==How To Generate and Use a Terrain Map Offline== | ==How To Generate and Use a Terrain Map Offline== | ||
‘’’Guide by [[Users:Fowlplay4|Fowlplay4]], with additional information from [[User:Stefan|Stefan]]. | |||
You can replace | ‘‘’Note:’’’ You can replace ‘’yourworld’’ (below) with anything you want; typically it should be set as the name of your server, unless you are developing for Graal Kingdoms. | ||
* '''Step 1:''' Download and | |||
* '''Step 1:''' Download (On Login Server), and run the Terrain Generator (Terrain Generator.exe) | |||
* '''Step 2:''' Change the Generator Options to your liking. (See Image Below) | * '''Step 2:''' Change the Generator Options to your liking. (See Image Below) | ||
** Click ‘’Generate World’’ to generate a map. (Map is generated using fractal algorithms.) | |||
** To make an island, click on the ‘’Islands’’ present button. | |||
** For a more detailed view, you can click on ‘’Show Level Details’’. | |||
** To directly edit the terrain, move the mouse up and down will clicking and holding the grid. | |||
** You may need to click ‘’Generate World’’ several times in order to find the best map. | |||
** After you find the best map, you can take note of the random seed that is shown in the top right corner of the window. | |||
** You can use this number / random seed to re-generate the same map in the future. (Click on ‘’random’’, and enter the number.) | |||
[[Image:Terraingenguide1.png|300px]] | [[Image:Terraingenguide1.png|300px]] | ||
* '''Step 3:''' Check off "Generate Graal levels" | * '''Step 3:''' Check off "Generate Graal levels". | ||
* '''Step 4:''' Click | * '''Step 4:''' Click ‘’Generate World’’. | ||
* '''Step 5:''' Create a Blank Folder for your New | * '''Step 5:''' Create a Blank Folder for your New GMap (See Image Below). | ||
[[Image:Terraingenguide2.png|300px]] | [[Image:Terraingenguide2.png|300px]] | ||
* '''Step 6:''' Save | * '''Step 6:''' Save ‘’yourworld.gmap’’ in your new folder. | ||
* '''Step 7:''' Navigate to your new overworld's folder | * '''Step 7:''' Navigate to your new overworld's folder; if done correctly, you should see all the levels in the folder. (See Image Below) | ||
[[Image:Terraingenguide3.png|300px]] | [[Image:Terraingenguide3.png|300px]] | ||
* '''Step 8:''' Open | * '''Step 8:''' Open ‘’yourworld_aa-01.nw’’. | ||
* '''Step 9:''' Lay an empty NPC on the level. (See Image Below) | * '''Step 9:''' Lay an empty NPC on the level. (See Image Below) | ||
[[Image:Terraingenguide4.png|300px]] | [[Image:Terraingenguide4.png|300px]] | ||
* '''Step 10:''' | * '''Step 10:''' Open the NPC and copy and paste the following script: | ||
<pre> | <pre> | ||
| Line 43: | Line 51: | ||
</pre> | </pre> | ||
* '''Step 11:''' Close the | * '''Step 11:''' Make sure to change ‘’yourworld_’’ to the name of the gmap you used earlier. Close the NPC Window / Script. | ||
* '''Step 12:''' You should see the terrain properly with the default GK | * '''Step 12:''' You should see the terrain properly with the default [[Worlds/Graal Kingdoms|GK]] Tileset. (‘’picso.png’’) | ||
To manipulate the terrain in the level editor, just click and drag the + symbol up or down. | |||
The GMap can then be uploaded to your server and be set up and used like any other GMap! | |||
Revision as of 23:15, 16 April 2011
The terrain generator tool can be used to generate maps for Graal which use 3D terrain.
How To Generate and Use a Terrain Map Offline
‘’’Guide by Fowlplay4, with additional information from Stefan.
‘‘’Note:’’’ You can replace ‘’yourworld’’ (below) with anything you want; typically it should be set as the name of your server, unless you are developing for Graal Kingdoms.
- Step 1: Download (On Login Server), and run the Terrain Generator (Terrain Generator.exe)
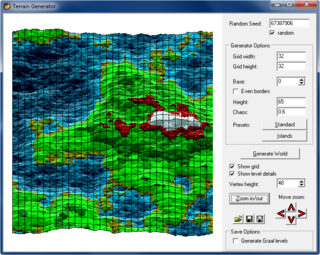
- Step 2: Change the Generator Options to your liking. (See Image Below)
- Click ‘’Generate World’’ to generate a map. (Map is generated using fractal algorithms.)
- To make an island, click on the ‘’Islands’’ present button.
- For a more detailed view, you can click on ‘’Show Level Details’’.
- To directly edit the terrain, move the mouse up and down will clicking and holding the grid.
- You may need to click ‘’Generate World’’ several times in order to find the best map.
- After you find the best map, you can take note of the random seed that is shown in the top right corner of the window.
- You can use this number / random seed to re-generate the same map in the future. (Click on ‘’random’’, and enter the number.)
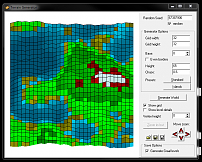
- Step 3: Check off "Generate Graal levels".
- Step 4: Click ‘’Generate World’’.
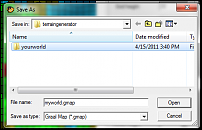
- Step 5: Create a Blank Folder for your New GMap (See Image Below).
- Step 6: Save ‘’yourworld.gmap’’ in your new folder.
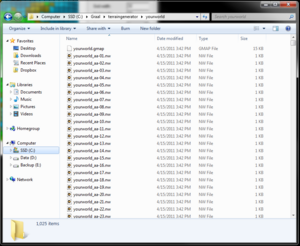
- Step 7: Navigate to your new overworld's folder; if done correctly, you should see all the levels in the folder. (See Image Below)
- Step 8: Open ‘’yourworld_aa-01.nw’’.
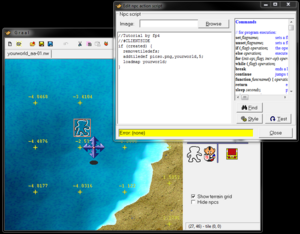
- Step 9: Lay an empty NPC on the level. (See Image Below)
- Step 10: Open the NPC and copy and paste the following script:
//Tutorial by fp4
//#CLIENTSIDE
if (created) {
  removetiledefs;
  addtiledef picso.png,yourworld_,5;
  loadmap yourworld;
}
- Step 11: Make sure to change ‘’yourworld_’’ to the name of the gmap you used earlier. Close the NPC Window / Script.
- Step 12: You should see the terrain properly with the default GK Tileset. (‘’picso.png’’)
To manipulate the terrain in the level editor, just click and drag the + symbol up or down.
The GMap can then be uploaded to your server and be set up and used like any other GMap!
