Creation/Dev/Gani: Difference between revisions
Pooper200000 (talk | contribs) No edit summary |
|||
| (2 intermediate revisions by one other user not shown) | |||
| Line 1: | Line 1: | ||
[[Category:Animations]] | |||
=Gani FAQ= | =Gani FAQ= | ||
| Line 132: | Line 133: | ||
==The Gani== | ==The Gani== | ||
Your gani should look this if you open it | Your gani should look like this if you open it with a text editor. You can also save this as football.gani: | ||
<pre> | <pre> | ||
Latest revision as of 14:21, 13 September 2009
Gani FAQ
by Kiirar
Also see the Gani Movies FAQ
Well, since I did the gani movie FAQ. I'll try my hand at a regular one. I'll teach you the basics of using Graalshop with a little bit of notepad editing. First of all, download the Dev package via the serverlist (click on the 'Update' tab and then select the developer package), then go to your Graal folder folder (C:\Graal2001\ or C:\Program Files\Graal\) and open up your Graalshop.
Let's start with telling you about the basic buttons and things you can do with Graalshop.
The Basics of Graalshop
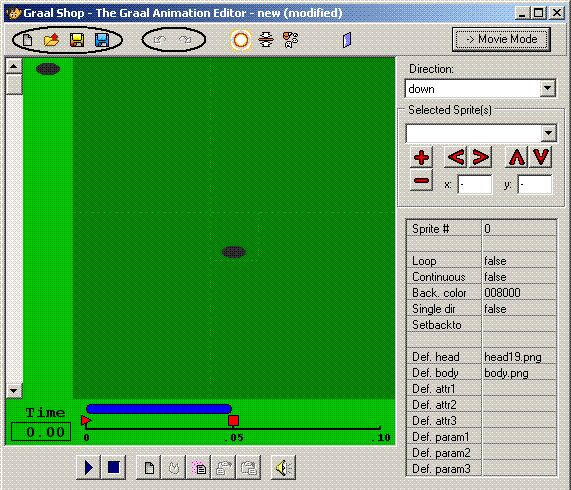
The page icon on the top left creates a new gani file from scratch. The folder icon opens a currently existing gani file. The two floppy disk icons are Save and Save As. The two arrow buttons are the undo and redo functions. Handy if you make a mistake, eh?
These buttons are more to do with our actual gani. The first one is obviously a play button. No definition required. The next one stops it at it's current frame. The next one adds a new animation frame (We'll get onto that shortly) and the flame one next to it, deletes the current frame. The next button copies the current animation frame. The one to the right of that, pastes it in before the currently selected animation frame, and the one next to that, pastes it in after the current frame. The far right one adds a sound into your gani.
These buttons here work with the gani, but moreso with the sprites. The first one you see is the Add Sprite Definition button. Sounds daunting? Well, it's not. We'll learn how to add sprites shortly.
The next one is pretty simple. It removes all unused sprites. So any sprites you haven't used in your gani will be removed from the sidebar with them in.
After this, the next button gets the sprites from one gani, and shoves them into this one.
Finally, the one that looks like a door, reverses your animation. Easy.
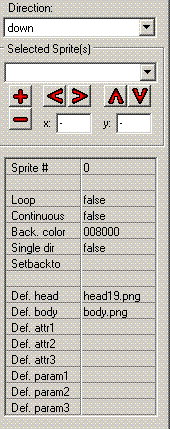
Those pretty little arrows and signs control the position and layer of the currently selected sprite. You click on the sprite to select it. The left and right arrows change the x position of the sprite by -/+1, and the up and down ones control the y position of the sprite +/-1. You can also drag and drop the sprites, or edit the position manually by using the textboxes you see. The + and - buttons control the layer of the current sprite. Try fiddling around with it. Click on the character's hat. Then press the - button. It will go below his head. Now, click the positive button to bring it back up.
The drop-down box on the top is the direction of the gani. The different options show us what the gani will look like facing other directions. (Note: You will also have to edit these as well as the one facing down if you want to use a multi-directional gani.)
The next drop down box is the currently selected sprite. It will let you choose different sprites, but only the ones in the current frame.
The little boxes below the movement control is where the fun really begins.
The first box you see is the Sprite # Button. It will show you the sprite number of the currently selected sprite. Ingenius.
The one below that is the Loop command. Change it, and the gani will play forever until something intervines.
Continous is self-explainatory.
Back. Colour will change your background to whatever colour you desire. I keep it as that greenish colour. Y'know, green.
Single dir will make the gani appear exactly the same, regardless of the current direction. Click that to true please. Ignore what the blue bar at the bottom does for now.
Below this block you will see the Def. # boxes. Let's go through those.
Def Head and Def Body are quite simple, change them to change the appearance of the character. Let's change 'em to head1331.png and body13.png for now, ne?
Next we have the attributes. These can be set in Graalshop, or by a script using setplayerprop #P*,attribute; where * is the number. Let's explain them in terms of hats. Attribute #1 will always be the hat used. In a script you can change the players hat by using setplayerprop #P1,hatnumber.png;.
It is kind of a way you can edit something about the player's gani through scripts. Difficult to explain. For now, let's change it to hat5.png. Don't I look ravishing, darling?
Next we have parameters, which can be set like this.
setani ani,parameter,parameter,etc;
It is similar to attributes in a way, but attributes are more to do with the player than the gani.
These little pictures here are your sprites. These are what makes the gani. We'll get on how to add more of those later.
The sprites are used, added, deleted in different frames to give the gani a moving effect. In fact, let's get onto the frames now.
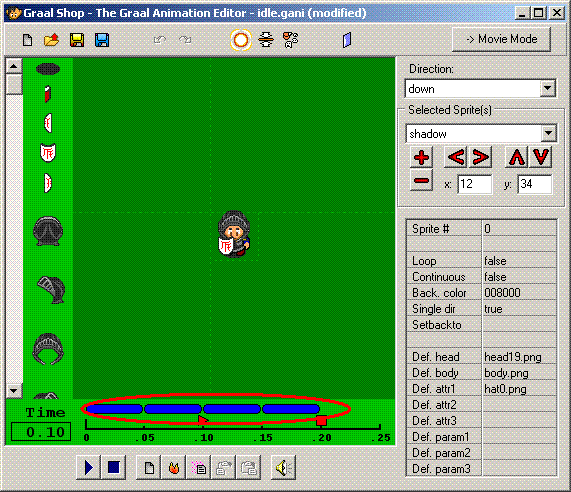
See this big blue bar on the bottom? Those are your frames, there should be four of them, since you changed your idle.gani to singledir=true. Drag the red triangle sign along and you should see your character spinning. The same will happen if you press play.
Okay. Now that you have four frames, delete all the ones that are not facing down. Drag the red bar til you get to a frame, then delete it. I told you how to earlier. Now that we're left with the down facing animation frame. Copy it. Then paste it after the current frame.
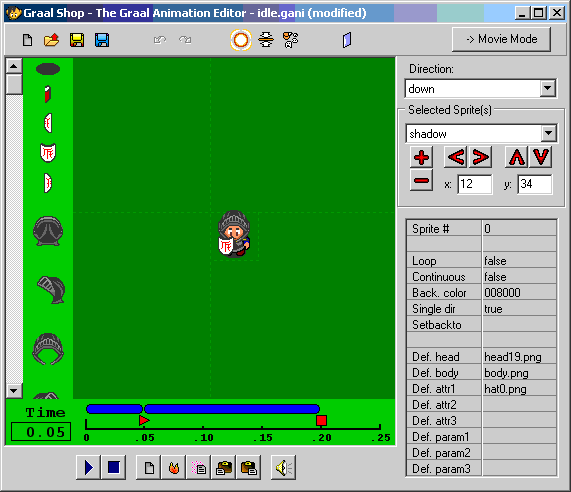
You're left with two identical frames. Select the newest frame. You see that red square on the time bar? Drag it to the right gently. The blue bar should extend. This little trick lengthens the frame. You can also do it to other frames by clicking between the two frames, then dragging. This is what it should currently look like.
Making a gani
Okay, let's edit our frame! Select the newest (and longest) frame. Then I want you to remove the body from it. Drag it to the column with the sprites in it, it should disappear. Go down until you find sprite #266. Also called "body carrying down". Drag it into place at x=8, y=18. It should appear above the shield and head. Send it a few layers back until it looks right. Now go up and find sprite #260. Drag that into place at x=8, y=0.
Now delete the shield, otherwise it will look silly. You can play back the gani to see what it looks like. Otherwise, let's move on.
It's time to learn how to import a sprite definition. Click on the button. Up appears a screen. Where it says "Image" add the line. "ball.png".
Edit the description how you like. But when it comes to setting the sprite index. Set it as 286, or it will overwrite other ones. Keep an eye out so you do not do this in future. On the right, there is some x,y,width,height coordinates you need to input.
These are the x,y,width,height coordinates (in pixels) of the image you want added to the gani. I believe the ball is 25x25. So change width and height to 25. Leave the starting x and starting y positions as 0. When you're done, press add.
Now copy and paste the long frame. Now you've got two identical frames, and another one at the start. Drag the ball you've added to x=12, y=-128. Copy and paste each frame, adding 30 to the y each time.
The ball should get lower and lower in each frame. It is also an idea to shorten each frame length with the ball in to 0.05 of a second.
Once the y gets to -8. Create another new frame, but set the coordinates to y=6. Now we're going to add a sound. Click the sound button, and drag it to the ball. A new option appears in the box on the right. Called "file". Change the blank to chest.wav.
Now, copy and paste this frame after the current one and change the ball's position to x=3, y=5. Get rid of the arm's sprite.
Now add sprite 261 to x=3, y=1. Fix the layers to how you want it to look.
Play it back, you have your gani. (Hastily put together however. ;))
Finally. Here's a little fun thing with gani script for beginners. Save your gani as football.gani. Now, remove all unused sprite definitions and open the gani with notepad.
Where you see the default body and head command lines. Add in the line.
COLOREFFECT 286 1 0 0 0.9
Nothing should happen in the editor, but load up the gani in a level. Fun times.
Well. This is all I can be bothered to write now, so mleh. You can always inform me when I make mistakes and here's the fun gani.
The Gani
Your gani should look like this if you open it with a text editor. You can also save this as football.gani:
GANI0001
SPRITE    0         SPRITES    0    0   24   12 shadow
SPRITE   12          SHIELD   14    0   16   20 shield down
SPRITE   42           ATTR1   96    0   48   48 hat down
SPRITE  102            HEAD    0   64   32   32 head down
SPRITE  202            BODY   64    0   32   32 body down
SPRITE  256        ball.png    0    0   25   25 Ball!
SPRITE  260            BODY    0  480   32   32 body hands up
SPRITE  261            BODY   32  480   32   32 body hands left
SPRITE  263            BODY   96  480   32   32 body hands right
SPRITE  266            BODY   64  512   32   32 body carrying1 down

SINGLEDIRECTION
SETBACKTO 2
DEFAULTATTR1 hat5.png
DEFAULTHEAD head1331.png
DEFAULTBODY body13.png
COLOREFFECT 256 1 0 0 0.9

ANI
   0  12  34,  202   8  16,  102   8   2,   42   0 -16,   12   8  24
WAIT 1

   0  12  34,  266   8  18,  102   8   2,   42   0 -16,  260   8   0
WAIT 2

   0  12  34,  266   8  18,  102   8   2,   42   0 -16,  260   8   0,  256  12 -128

   0  12  34,  266   8  18,  102   8   2,   42   0 -16,  260   8   0,  256  12 -98

   0  12  34,  266   8  18,  102   8   2,   42   0 -16,  260   8   0,  256  12 -68

   0  12  34,  266   8  18,  102   8   2,   42   0 -16,  260   8   0,  256  12 -38

   0  12  34,  266   8  18,  102   8   2,   42   0 -16,  260   8   0,  256  12  -8

   0  12  34,  266   8  18,  102   8   2,   42   0 -16,  260   8   0,  256  12   6
PLAYSOUND chest.wav 1.4375 -0.0625

   0  12  34,  266   8  18,  102   8   2,   42   0 -16,  261   3   1,  256   3   5,  263  16   0

   0  12  34,  266   8  18,  102   8   2,   42   0 -16,  256   3   5,  261   3   1,  263  16   4

   0  12  34,  266   8  18,  102   8   2,   42   0 -16,  256   3   5,  261   3   1,  263  16  -1
ANIEND


