Uploading and Loading AssetBundles: Difference between revisions
No edit summary |
|||
| (7 intermediate revisions by one other user not shown) | |||
| Line 5: | Line 5: | ||
You will need to have Unity installed for this part. | You will need to have Unity installed for this part. | ||
You will also need to have the “Quattro3D- Unity Project for bundle asset creation.7z" Unity project installed from | You will also need to have the “Quattro3D- Unity Project for bundle asset creation.7z" Unity project installed from : | ||
https://www.graalonline.com/downloads/file?name=Quattro3D-UnityProjectforbundleassetcreation.zip | |||
I will be going through an example, demonstrating how it’s done. | I will be going through an example, demonstrating how it’s done. | ||
| Line 21: | Line 23: | ||
In the top left menu hit (Assets>Import New Asset/Import Package). Go to the location of your prefabs and select them and press Import. | In the top left menu hit (Assets>Import New Asset/Import Package). Go to the location of your prefabs and select them and press Import. | ||
[[File: | [[File:Uploading assetbundles.png|frameless|371x371px]] | ||
[[File:Prefabs.png|frameless|476x476px]] | |||
[[File:Imported prefabs.png|frameless|773x773px]] | [[File:Imported prefabs.png|frameless|773x773px]] | ||
Now that we’ve imported our assets, we’ll create an assetbundle to be uploaded to the server; | Now that we’ve imported our assets, we’ll create an assetbundle to be uploaded to the server; | ||
| Line 49: | Line 51: | ||
Finally to upload the asset to the server, login on rc, go to levels/assetbundles and drop the “.txt” file there. | Finally to upload the asset to the server, login on rc, go to levels/assetbundles and drop the “.txt” file there. | ||
It should be automatically downloaded to /Users/”yourusername”/AppData/LocalLow/Graal Worlds/Levels3d/assetbundles[[File:Uploading assets through rc.png|center|frameless|477x477px]]You’re strongly advised to generate a unitypackage too when you generate an asset bundle and upload it to the server, so that everyone can rebuild the bundle on every platform. | It should be automatically downloaded to /Users/”yourusername”/AppData/LocalLow/Graal Worlds/Levels3d/assetbundles[[File:Uploading assets through rc.png|center|frameless|477x477px]]''You’re strongly advised to generate a unitypackage too when you generate an asset bundle and upload it to the server, so that everyone can rebuild the bundle on every platform.'' | ||
To view your asset and your prefabs, login to the Client, hit F10 to open the Bundle Explorer and search for your asset name.[[File:Bundle explorer.png|center|frameless|768x768px]] | To view your asset and your prefabs, login to the Client, hit F10 to open the Bundle Explorer and search for your asset name.[[File:Bundle explorer.png|center|frameless|768x768px]] | ||
| Line 62: | Line 64: | ||
function onCreated() { | function onCreated() { | ||
(@"3D/Dev/AssetManager").loadAssetBundle("documentationexample"); | |||
} | } | ||
| Line 72: | Line 74: | ||
player.chat = "example loaded"; | player.chat = "example loaded"; | ||
temp.prefab = GameObject:: | temp.prefab = GameObject::fromassetbundle("documentationexample", "assets/example/bomb.prefab"); | ||
this.bomb = Object::Instantiate(Type::GameObject, temp.prefab); | this.bomb = Object::Instantiate(Type::GameObject, temp.prefab); | ||
this.bomb.transform.position = | this.bomb.transform.position = v3(player.x + 5, player.z, player.y); | ||
} | } | ||
| Line 82: | Line 84: | ||
} | } | ||
|}[[File:Loading prefabs.png|center|frameless|406x406px]] | |}[[File:Loading prefabs.png|center|frameless|406x406px]] | ||
{| class="wikitable" | |||
!(@"3D/Dev/AssetManager").loadAssetBundle("documentationexample"); | |||
|} | |||
The above method loads and downloads the AssetBundle. | |||
{| class="wikitable" | |||
! function onAssetBundleDownloaded(bundlename) {} | |||
|} | |||
And Implementing the '''''onAssetBundleDownloaded''''' will make sure the Assetbundle has been loaded. We could've skipped this step and directly created the prefab, but best is to make sure the Asset has been loaded. | |||
We then create a prefab: | |||
{| class="wikitable" | |||
!temp.prefab = GameObject::fromassetbundle("documentationexample", "assets/example/bomb.prefab"); | |||
|} | |||
instantiate it, | |||
{| class="wikitable" | |||
!this.bomb = Object::Instantiate(Type::GameObject, temp.prefab); | |||
|} | |||
and give it a position in the scene: | |||
{| class="wikitable" | |||
!this.bomb.transform.position = v3(player.x + 5, player.z, player.y); | |||
|} | |||
Latest revision as of 06:12, 20 October 2021
Up until now, we have been using PrimitiveTypes for our GameObjects.
In this section, we will start using different GameObjects. I will go over how to upload your assetbundles containing all your customized prefabs to the server. How to load, instantiate, and manipulate them.
Uploading AssetBundles
You will need to have Unity installed for this part.
You will also need to have the “Quattro3D- Unity Project for bundle asset creation.7z" Unity project installed from :
https://www.graalonline.com/downloads/file?name=Quattro3D-UnityProjectforbundleassetcreation.zip
I will be going through an example, demonstrating how it’s done.
Begin by choosing what prefabs you want to upload. In our case, I will upload a bomb and a character prefab, which I already have ready in a different project.
Note: Remember you cant put scripts in your asset bundles.
Open the Unity project downloaded (“Quattro3D- Unity Project for bundle asset creation.7z"). This project contains a script that builds the assetbundles and puts them in the Assets/StreamingAssets folder, which will hold all our uploadable files.
In the Assets folder, I will create a new folder and name it Example.
Next I will import my prefabs;
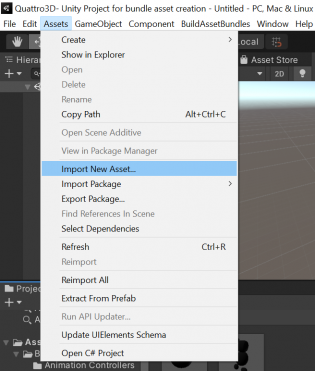
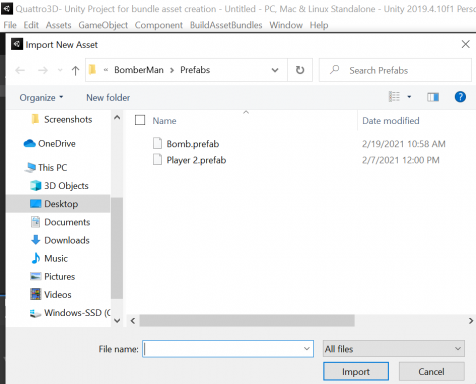
In the top left menu hit (Assets>Import New Asset/Import Package). Go to the location of your prefabs and select them and press Import.
Now that we’ve imported our assets, we’ll create an assetbundle to be uploaded to the server;
Using the Unity way of creating assetbundles by flagging the prefabs:
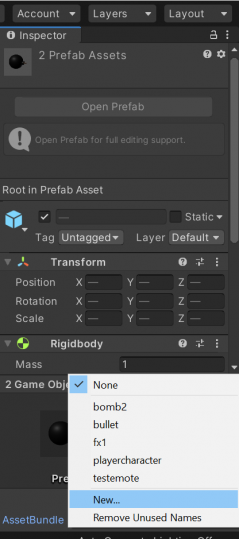
Select all the prefabs in the asset folder, the Inspector Window should open. At the bottom right of your screen, in the Inspector Window, create or select an existing name for your assetbundle.
The bundle will embed all the assets/prefabs under that flagged directory. You can of course put multiple prefabs/files/subdir...etc inside an asset bundle.
Now build your asset by pressing on BuildAssetBundles>PackagesBuilder>buildAssetBundles in that project.
The built asset will be stored in the downloaded Unity Project in “Quattro3D- Unity Project for bundle asset creation\Assets\StreamingAssets”
The file that we’ll use to upload to graal should end with “.txt”
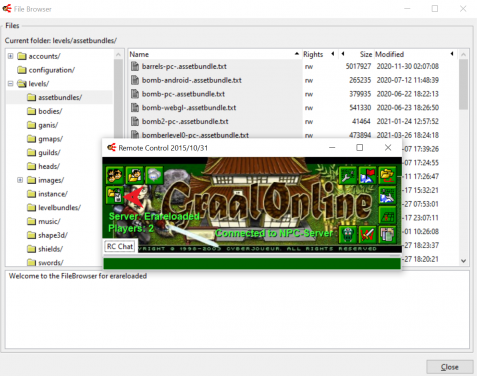
Finally to upload the asset to the server, login on rc, go to levels/assetbundles and drop the “.txt” file there.
It should be automatically downloaded to /Users/”yourusername”/AppData/LocalLow/Graal Worlds/Levels3d/assetbundles
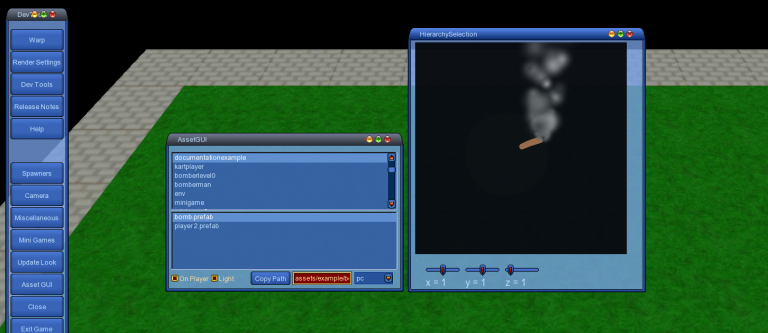
You’re strongly advised to generate a unitypackage too when you generate an asset bundle and upload it to the server, so that everyone can rebuild the bundle on every platform. To view your asset and your prefabs, login to the Client, hit F10 to open the Bundle Explorer and search for your asset name.
ClientSide Loading Assets
Now to load your prefabs using GraalScript; to your code add the following:
You can use the Bundle Explorer (F10) to copy the path of the AssetBundle.
| findplayer("Graal5918039").addweapon(this.name);
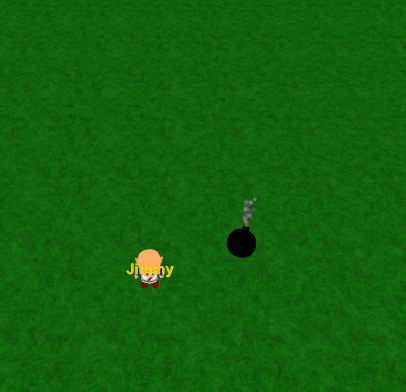
//#CLIENTSIDE function onCreated() { (@"3D/Dev/AssetManager").loadAssetBundle("documentationexample"); } function onAssetBundleDownloaded(bundlename) { if (bundlename == "documentationexample") { player.chat = "example loaded"; temp.prefab = GameObject::fromassetbundle("documentationexample", "assets/example/bomb.prefab"); this.bomb = Object::Instantiate(Type::GameObject, temp.prefab); this.bomb.transform.position = v3(player.x + 5, player.z, player.y); } } |
| (@"3D/Dev/AssetManager").loadAssetBundle("documentationexample"); |
|---|
The above method loads and downloads the AssetBundle.
| function onAssetBundleDownloaded(bundlename) {} |
|---|
And Implementing the onAssetBundleDownloaded will make sure the Assetbundle has been loaded. We could've skipped this step and directly created the prefab, but best is to make sure the Asset has been loaded.
We then create a prefab:
| temp.prefab = GameObject::fromassetbundle("documentationexample", "assets/example/bomb.prefab"); |
|---|
instantiate it,
| this.bomb = Object::Instantiate(Type::GameObject, temp.prefab); |
|---|
and give it a position in the scene:
| this.bomb.transform.position = v3(player.x + 5, player.z, player.y); |
|---|
